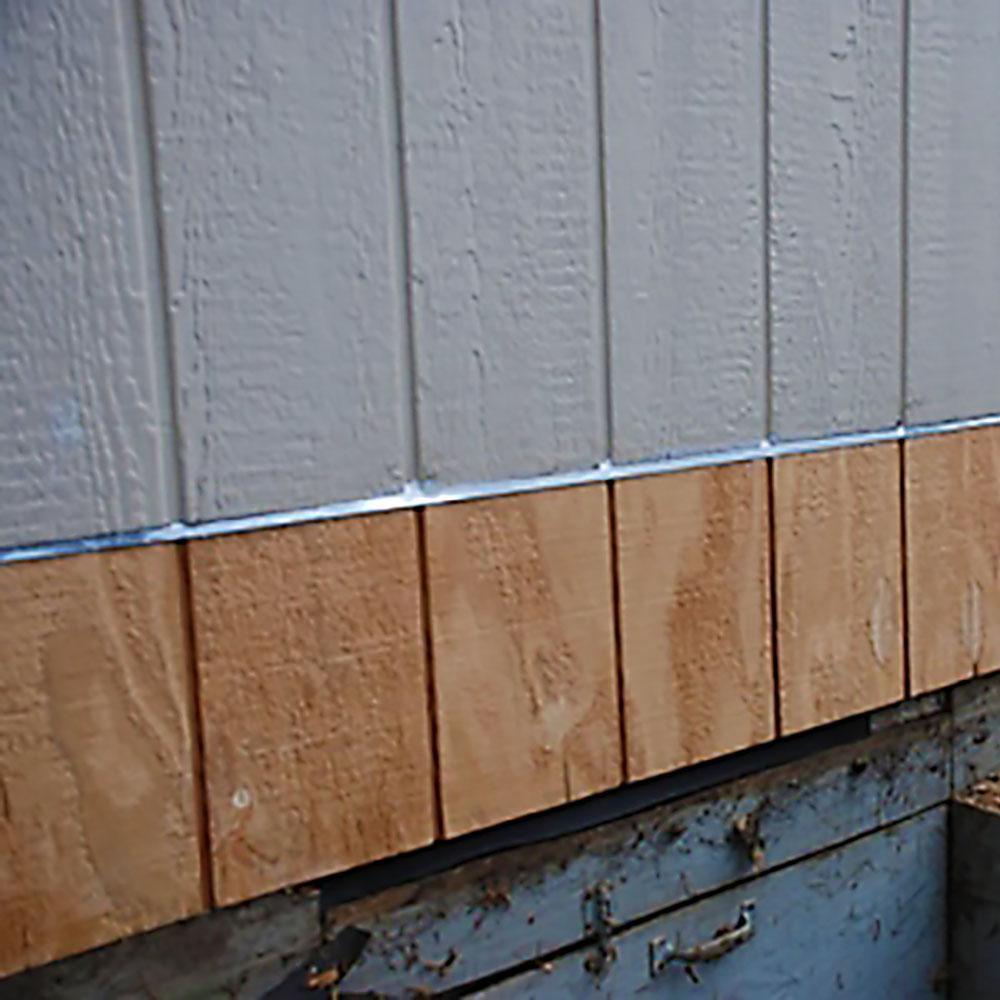
Flashing Against Existing Panel Siding

Pin On Info With Some How To S

Pin On Deck

Pin On Chimney

Pin On Metal Roofs

Gable Large Jpg 2 375 2 880 Pixels Attic Renovation Attic Flooring Attic Remodel

Tips On Removing Vinyl Siding For Attaching Ledger Board Building A Deck Under Deck Ceiling Under Deck Roofing

Above the roof sheathing.
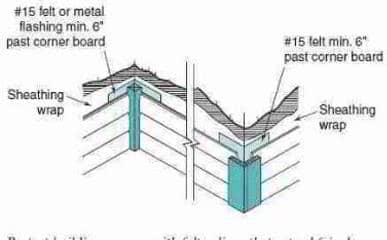
Flashing against existing panel siding. Or pull the nails out of the closest layer of siding and slip the flashing up under it and hopefully under the moisture barrier. It is always recommended to install step flashing behind stucco dryvit wood panel lap siding vinyl siding cedar shingle siding etc. Begin at either end of the wall and set the level middle section of the z flashing onto the top edge of the siding panel with the wider flange upward and against the wall framing. Slip in the flashing.
However in most instances step flashing should be installed behind siding. In certain instances flashing may need to be installed on the exterior of siding. Wall or siding connection to foundation top porch floors slabs. Cover with cap flashing.
Flush the end of the flashing length with the wall corner and secure the flashing to the framing with an 8d nail at each wall stud. Using a metal j flashing between these types of transitions provides a barrier between siding and transitions that protects against water intrusion. Imo and that is all it is. Building wall or siding flashing details at horizontal surfaces.
Nail it to the sidewall or glue it if nailing isn t possible. Since newer installation guidelines do not recommend caulking this joint but instead recommend leaving a small gap and flashing behind the ends of the siding i think it is more prudent to add flashings when it is possible to do so. On a wall to be covered with wood cement board vinyl or metal. The only way is to cut a groove in the siding and flash the roof wall intersection.
Install the flashing before you finish the top of the brick wall as the flashing must go behind the siding as well as behind and under the top row of bricks that angle outward to cover the top. But the j cap also creates a consistent line. Lift the bottom shingle and slip in the kickout flashing. Flashing is a strip of metal usually aluminum about 8 inches long and bent at 90 degrees with each side at least 5 inches wide.
Flexible flashing tape seals the eave to the wall. Once the flexible flashing is set i apply a piece of housewrap along the wall where the fascia meets it. This aritcle describes the cause repair and prevention of leaks rot damage at a wood framed wall that was not properly flashed and sealed at the wall bottom. Flashing materials choices installation details specifications.
I use a wide piece of flexible flashing tape to protect the area between the subfascia and the wall.

Remediation Details Parapets Branz Ltd Weathertight Homes Nz Siding Construction Parapet Roof Detail

How To Insulate A Wall From The Outside Exterior Wall Insulation Exterior Foam Insulation Rigid Foam Insulation

This Illustration Shows The Correct Way To Detail The Transition Between Dissimilar Cladding Types A Flas Exterior Cladding Cladding Installing Exterior Door

Quality1sthome Qualityfirst Homeimprovement Siding James Hardie Instructions Siding Fiber Cement Siding Installation Installing Siding Fiber Cement Siding

Glasswood Passive House Wall Assembly The 5 Wall Assemblies Hammer Hand Passive House Passive Design House Exterior

Siding Transitions Jlc Online
Wood Siding Flashing Details At Joints Corners

Pin On Roof Tie In

Image Result For Window Detail Interior Windows Window Frame Interior Window Trim

Pin On Roof

Tool To Remove Panels Standing Seam Roof Metal Roofing Forum Metal Roof Panels Metal Roof Roof Panels
Gibraltar Building Products 3 8 In X 10 Ft Galvanized Steel Z Bar Flashing Szb38g The Home Depot

Replacing Metal Corner Caps On House With Wood Siding Siding Repair Masonite Siding Wood Siding

Metal Roofing Systems Guttering Metal Roof Construction Metal Roofing Systems Metal Roof

Wall Construction For 5 000 Sq Ft Full Masonry Home In Chicago Greenbuildingadvisor Brick Cladding Exterior Brick Veneer Brick Veneer

Metal Roofing Installation How To Install Metal Roofing Over Shingles Metal Roof Over Shingles Metal Roof Installation Roof Installation

Tile Sidewall Flashing Flashing Installation Matterhorn Metal Roofing Youtube

Pin On Flashing Detail
Https Encrypted Tbn0 Gstatic Com Images Q Tbn 3aand9gctdkzmp3fd66flzq4eiyq956rbgcb2mm9zigrvvzmoomwtpwrpk Usqp Cau

Pin On Diy Outdoor Projects

How To Roof A House Diy Roofing Roofing Home Construction

Simple System Existing Slope Sheet Metal Coping Sketch Drawing The Image Shows A Sketch Of Metal Coping Ins Roof Architecture Roof Edge House Extension Design

Pin On Common Problems Solutions

Pin On Gabled End

Robot Check Teak Outdoor Building A Deck Outdoor Garden Furniture

Soorten Vinyl Gevelbeplating Gevelbeplating Soorten Vinyl Diy Exterior Siding Installing Wood Siding Installing Siding

How To Install A Metal Roof Ridge Cap For Union S Masterrib Panel Metal Roof Installation Roof Installation Metal Roof

Standing Seam Metal Roof Know Which Types Of Metal Roofs Work Best In Which Regions And Climates Standing Seam Metal Roof Metal Roofing Prices Roof Cost

Rain Screen Siding Guide Mataverdedecking Com Rainscreen Cladding Roof Insulation Details Siding Construction

Pin On Front Porch

Remediation Details Roof Claddings Branz Weathertight Roof Cladding Roof Truss Design Skillion Roof

In Imitation Of Building A Other Home Or Retrofitting An Existing One Choosing The Right Type Green Roof House House Paint Exterior Green House Paint Exterior

Pin By Michael Mcvicker On Roof Roof Insulation Exterior Insulation Roof Design

Galvalume Metal Siding Everyone Loves Steel Siding House Cladding Exterior Siding

Replacing Asbestos Siding With James Hardie On Home In Glassboro Nj Siding Asbestos Siding Hardie

Suntuf Installation Instructions 5 Corrugated Roofing Outdoor Projects Garden Structures
Light Beige Hardie Planks In Downingtown Pa Cedar Siding Fiber Cement Siding Installation Fiber Cement

Soffit At Hardie Board Siding Construction Detail Google Search Siding Construction Hardie Board Siding Roof Edge

Exterior Insulation Retrofit At Window Sill 1 1 2 In Rigid Foam Exterior Insulation Window Construction Housewrap

Found On Google From Greenbuildingadvisor Com Exterior Insulation Rigid Insulation Insulation

Pin On Outside

Pin On Are Test Prep

