Flashing A Shed Roof To A Wall

Pin On Roof

Pin On Metal Roofs

Pin On Diy And Crafts

Pin On Back Porch

Pin On D E T A I L

Sealing Structural Penetrations At Roof Wall Intersections Roofing Roof Repair Diy Roof Repair
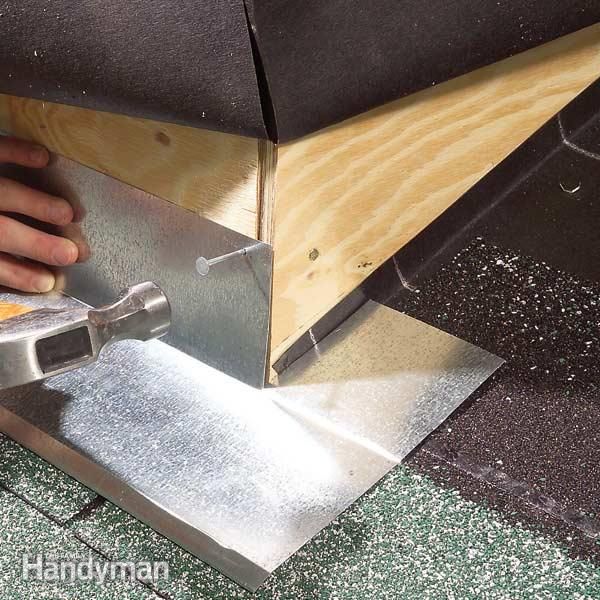
The metal flashing is formed with a hook edge and cleated on 12 centers.
Flashing a shed roof to a wall. Flashing joints are lapped 6 in the direction of water flow. A vertical cut about 2 in. If installed along the foundation the membrane should cover the joint where the sill meets the foundation. Flashing is installed to surround roof features such as vents chimneys and skylights.
Because most roof flashing is required to extend up the wall a minimum of 4 and some a minimum of 5. The roof flashing is then placed up behind this through the wall z bar flashing on the outside of the vertical blocking backing material. Most simply use a nominal 6 piece of lumber. I fold a piece of metal flashing for the inside corner between the subfascia and the wall.
It should tuck under the sheathing wrap above and over the flashing below. Drip edge metal valley flashing dormer chimney and kickout flashing are types of roof flashing that shed water away from the connections between roofs walls chimneys and other building assemblies. Above a lower roof where it abuts the wall in all cases make sure to detail the flashing membrane so that it sheds water. The easiest way to accomplish this is by using smartvent as an off wall shed exhaust ventilating the shed roof without removing the existing flashing and siding off of the shed wall means one less hassle and one less chance of having the expense to replace the wall siding and losing the bid.
Although flexible flashing tape is pretty durable it s best to protect it with metal flashing and to treat it as a backup for water leaks. Click here for detailed installation instructions. Roof flashing is a thin material usually galvanized steel that professional roofers use to direct water away from critical areas of the roof wherever the roof plane meets a vertical surface like a wall or a dormer. Long helps it to fold onto the roof sheathing.

Pin On Diy Home Exterior

Pin On Roof

Pin On Home Improvement

Pin On Patio Roof

Pin On Roof

Pin On Roof

Pin On Are Bdcs Terms

Pin On Home Improvement And Diy

Pin On Idei Pentru Grădină

Pin On Roof Flashing

Pin On Construction Techniques

Pin On Sketchup

Pin On Week 6

Pin On For The Home

Pin On Water Proofing

How To Install Drip Edge On Shed Roof Drip Edge Shed Roof Roof Edge

Pu Polyurethane Wall Or Roof Insulated Sandwich Panel Caset Detalles Constructivos Zingueria

Pin On Roof Tie In
Https Encrypted Tbn0 Gstatic Com Images Q Tbn 3aand9gcruy53z947s9uhn3zsa6fx Zqehzpknmspjxcwyj8whiw0tgy7e Usqp Cau

Pin On Roof

Pin On Building Science

Pin On Skylite

Pin On Roof

Pin On My Shed

Metal Roofing Systems Guttering Metal Roof Construction Metal Roofing Systems Metal Roof

Pin On Rooftop

Pin On Haley

Pin On Framing

How To Install Metal Roof Rake Trim For Union S Masterrib Panel Metal Roof Installation Metal Roof Houses Roof Installation

Attaching A Ledger To Brick Walls Requires The Best Methods Building A Deck Exterior Brick Brick Wall
Pin On Remodels And Renovating

Pin On Building Tips

Pin On House Remodel

Pin On House Addition

Pin On Construction

Pin On Roofs

Pin On Roof Flashing

How To Roof A House Diy Roofing Roofing Home Construction

Cricket And Stepflashing Masonry Chimney On Shingle Roof Stroitelstvo Doma Dom Proekty Nebolshih Domov

Pin On Roofing 101

How To Do A Small Pitched Roof Pergola Patio Roof Curved Pergola

Shed Plans 8x12 Lean To Shed Plans 01 Floor Foundation Wall Frame Now You Can Build Any Shed In A Weekend Wood Shed Plans Diy Shed Plans Lean To Shed Plans

